Showing posts with label MYO. Show all posts

Monday, September 21, 2009

Draft stopping critters


Critters That Keep Out the Cold


Stationed in a window or up against a door this winter or fall, these charming homemade draft blockers will help keep indoor temperatures up and fuel bills down -- provided they don't get coaxed off the job for a playdate, that is. Both are simply fashioned from a pair of tights and filled with rice, which makes them posable enough to tuck tightly into nooks and corners.

Found on Disney family fun craft website (Where you can find the instructions too) for a perfect first day to autumn.

Friday, August 21, 2009

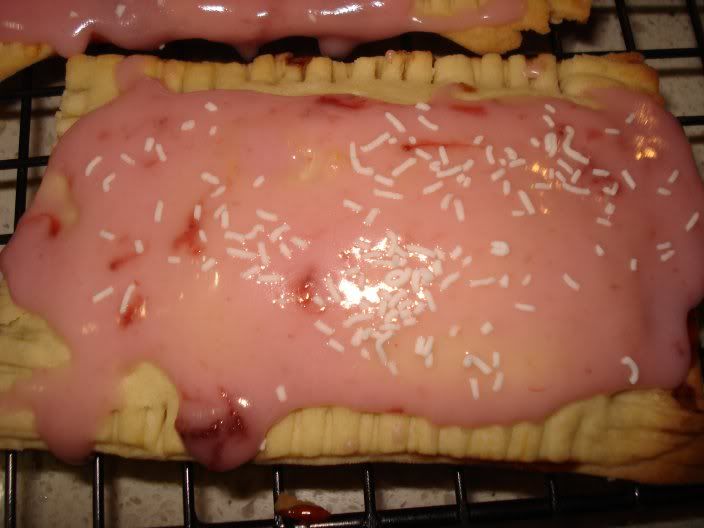
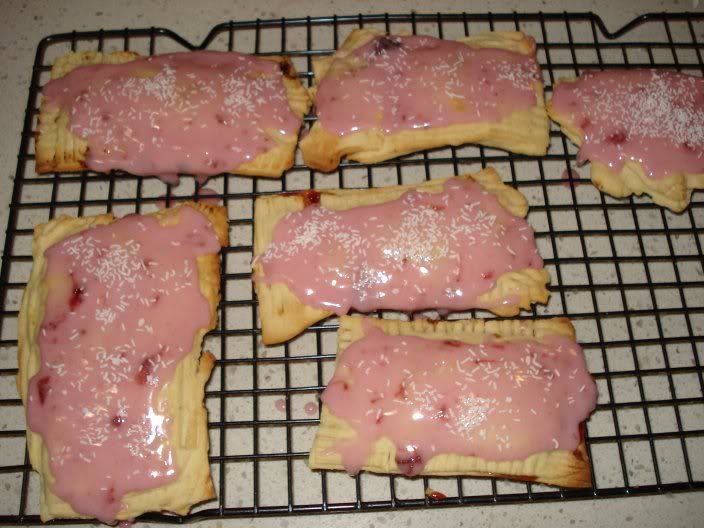
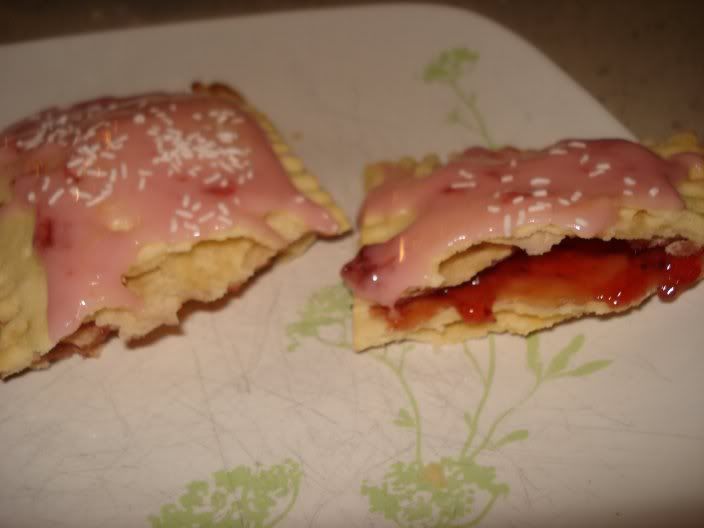
Home made pop tarts

Thanks to boo_zombie and ragdollpirate our mornings will now be filled with the evil goodness of toaster pastries, but they’ll be homemade. Personally, I’m thinking s’mores, but if you wanted to cross over to the salty side, you could fill them with bacon and cheese. Or how about scrambled eggs and cheese?

Grab the full recipe here (or just scroll down) and get baking!


Cheesy nom nom nommmm lol

YOU SHOULD THANK RAGDOLLPIRATE SHE GAVE ME THE RECIPE COZ SHE IS TOTALLY AWESOME AND I <3>

Homemade Pop Tarts Recipe
23 min | 15 min prep
12 pop tarts
For Pie Crust
• 1 1/2 cups flour
• 1/2 teaspoon salt
• 1/4 cup shortening
• 1/4 cup butter, softened
• 3 tablespoons cold water
For Filling
• 1/2 cup jam (your choice)
For Glaze
• 1 cup powdered sugar
• 3 ounces milk, to thin
• candy sprinkles
1. Preheat oven to 450°F
2. Combine flour and salt in a large bowl. Add shortening and butter and blend with a fork, pastry cutter, or your hands. Blend until mixture is fairly coarse. Add water, 1 tablespoons at a time, gently mixing dough after each addition until dough forms a ball.
3. Place dough on a lightly floured surface and roll into a square/rectangle. To about 1/8 thickness. Cut out long strips about 2 inches wide and 3 inches long. Repeat until dough runs out.
4. Take one pie crust rectangle and lace 1 teaspoons of jam on top. Cover with another piece of pie crust and crimp all four edges. Repeat with the rest of dough. Place Pop-tarts on a baking sheet with parchment paper, and bake for 7-8 minutes.
5. While pop-tarts are baking, make glaze. Place powdered sugar in a bowl. Pour milk slowing until it has a consistency of really thick syrup. 1/2 a tablespoons to 1 tablespoons might be enough.
6. Once pop-tarts are done and cooled, top with glaze. Sprinkle and decorate with colorful sprinkle.
For cherry filling just whiz some cherry pie filling until smooth.

For Chocolate add coco powder to the dough and just add bits of chocolate into the middle.

Thursday, June 18, 2009

Frugal finger paints


You can make your own finger paints by mixing 2 tablespoons of white flour with a little water to make a thin paste and then adding a few drops of food coloring.
To make painting extra easy for a young child, have her paint on waxed paper taped to a table in the kitchen or outdoors. Put a blob of paint down on the paper and show her how to slide her fingers around. If you want to save her creation, press a piece of regular paper over the waxed paper and peel gently away; hang to dry.
I personally used normal paper and it worked fine. This does not make the best paints in the world but it really amuses a baby. Best of all you know it's non-toxic. She kept eating it and it was great to have the piece of mind of knowing it was just coloured flour and water.


Tuesday, June 2, 2009

How to bake cookies without a recipe

I have read a million cookbooks and cooking magazines and it has gotten to the point with my self teaching in the kitchen that I no longer need a recipe so long as I understand the technique. 
Problem is that it is harder to find cooking technique books than it is to find run-of-the-mill cookbooks.
I want to cook things without a recipe and do not want to rely on them.

Here I will use cookies for example, and I hope to teach someone something in the process.

The basic ingredients in cookies are:
Flour
Sugar
Egg
Flavouring
Baking soda
Extra
Fat (Butter, margarine or any other fat)

Now it would make common sense not to use bacon grease as your fat, unless for some reason you wanted to make pork cookies, but the idea here is to learn the science behind cooking so if you ever wanted to make bacon cookies you could. The fat can also be a nut butter or shortening. Think FAT! Oil is not a particularly good choice here because it is not very stiff. 

I start with the fat and the sugar. About equal parts or each, however some like sugarier cookies. Remember more sugar will make them crumblier as the sugar does not bind as well as the other ingredients.
Also, with the sugar, whether you use brown, white, natural, cane or even finely crushed butterscotch or mint candies will make a big difference in your cookies. All white sugar will cause it to come out like a sugar cookie where as brown sugar gives it a softer chew. Crushed candies will also give a flavour to the cookies so you may want to omit any other flavouring. Experiment with whatever sugars you like, keep in mind that if you are looking for a chocolate chip cookie consistency it is usually done with a 50/50 mix of brown and white sugars. More white if you want it crispier and more brown if you want it softer. I personally like 75% brown and 25% white but again, whatever you like, have on hand or depending on the kind of cookie (I might make a bacon cookie with 100% brown sugar but a Christmas style sugar cookie would be made with all white sugar).
Mix this very well, some call it "creaming" the sugar and butter.

Eggs are kind of like the glue that holds it all together, it also causes the cookies to brown. Depending on what kind of cookies you are making and how many would determine how many eggs you use. I have never experimented with too many eggs, so I don't know what happens if you put lots of eggs in your cookies. The amount of egg to batter is hard to describe, but I personally like one egg to each cup of fat used. 

The flavouring is normally vanilla extract when making cookies, though any extract can be used (Almond, mint etc) as well as other kinds of liquid flavouring (Including juice) Add as much of this as you like, keeping in mind that too much will overpower the taste of the cookies and not enough will not have a strong taste at all. It would also be too much flavouring if it drastically changes the texture of the dough you have so far. For myself, I usually add a few tablespoons of flavouring or extract to each cup of fat used though I have seen many recipes and have used 2 eggs for each cup of fat so it doesn't have to be so precise (in fact, this whole process does not have to be precise).

Baking soda causes to cookies to rise. I usually about one teaspoon to each cup of fat used but I have made cookies without it and with extra. It really doesn't make a huge difference but if you want fluffy cookies, use it. 

I usually mix it at this point, but you can not over mix cookies, so mix as much as you like.

Extra stuff are things like oatmeal, chocolate chips, M&Ms, coconut, raisins, crushed candy bar pieces, nuts or really any thing else you want in your cookies. Add as much as you like here. This is really what makes the cookies special and individual so have fun. you can also chose not to add anything here.

Flour is of course the part that makes it all come together. More flour will make it stiffer and less four will make it runnier. The look and feel here will be the biggest key as to whether or not there is enough. You want to be able to make balls with the cookie dough.
If you wish to make a more chocolaty cookie, you can substitute some of the flour for cocoa. Cocoa will make the dough  gooey so I usually use a 25% cocoa to 75% flour mix if making chocolaty cookies. This makes black cookies as opposed to brown or white cookies and taste really chocolaty.

Stir this until it is all mixed well.

To bake, place cookies by balls on a cookie sheet. Grease the pan if your pan is conducive to things sticking to it. Parchment paper is a good idea and I have even used tin foil as well. Anything to keep the cookies from sticking. Of course you don't need to add anything if you have a nice non-stick baking pan.
Space them with enough room so that the cookies don't touch each other when they spread out from the heat. If you are concerned about the cookies spreading out and sticking to each other just put less on each pan and cook in more batches. Better to be safe than sorry and by the second batch you will know exactly how to space them for maximum cookies baked per batch.

Cook at about 325 degrees until browned on top and they look yummy. The bigger you made the balls the longer it will take to cook. Check them often because cookies cook quickly. small cookies cook in under 10 minutes where larger hand sized cookies can take about 15 minutes. This really depends on the size of the cookie. 

The cookies will be soft when they come out so you will want to let them cool. They can cool in the pan, on a cooling rack, in a plate or on a paper bag. You can let them cool wherever you like. this will help them stiffen and make them easier to eat and distribute. I know you want to eat them hot. Timing is key here, eat some when they are cooled off a little but still warm for best results though cookies are good totally cooled too (but you knew that!)


Hope that gave some insight to baking cookies. Now to figure out how to bake cake without a recipe! It's probably pretty similar.

Thursday, May 28, 2009

Make your own chocolate syrup

I find that this recipe impresses people. Maybe they figure that chocolate syrup is made in a factory and bottled, I am not sure but people are always surprised when I tell them I make my own chocolate syrup for a fraction of the cost of the store bought kind and is really easy. Funny thing is that I found the recipe on the side of a can of store bought cocoa.


In a saucepan combine:
1 cup cocoa
1 1/2 cups sugar
1/2 tsp salt
1 1/2 cups water

Bring to a boil and simmer for 5 minutes stirring constantly


store in an air tight container in the fridge. Mine always gets eaten in about 3 weeks to a month so I am not sure how long this keeps for but I would guess quite a while because it's only cocoa/sugar water. 
I also store mine in an old chocolate syrup container I had left over from when I used to buy it. I wash it between batches though so it doesn't get crusty but you can keep it in any air tight container.

Use this as you would store bought syrup. I like to pour the fresh warm syrup on ice cream, put a little in my coffee, iced coffee or frappuccino, and even make chocolate milk and soy milks with it.


Wednesday, May 27, 2009

Make your own sports drinks

We all need to keep hydrated but store bought sports drinks like Gatorade are full of sugar and other things that are less than desirable.
I found this recipe in a magazine to make your own sports drinks this summer, and every other summer for that matter.

Mix one part fruit juice and one part water and add a pinch of salt

Yeah that's it.

After seeing this "recipe" (The quotes are because I would call this less of a recipe and more of a method) I decided to google "Make your own sports drink" and found many other recipes. Some called for tea while others called for juice. Some called for the water while others didn't. I even found one that added baking soda. The thing in common with all of them though was the pinch of salt. 
I think that you could make this with any yummy juice or tea you like, water it down to reduce the sugar content if you like but basically just add a pinch of salt to whatever you are drinking.

Have fun and stay safe this summer!

Friday, May 22, 2009

Make your own Cleaning wipes

Cleaning wipes are expensive but so convenient! 
Thanks to Organizedhome.com for this tutorial.
You can use any tightly sealable container for this. You probably have everything you need to do this in your home. I know I do.
Original tutorial is HERE


Wipe Out! Make Your Own Cleaning Wipes

Who doesn't love commercial cleaning wipes? They're wickedly convenient--but also wickedly expensive and often contain harsh chemicals.

The alternative: make your own!

Homemade cleaning wipes are easy to make, economical, and contain only those cleaning agents you select.

Put homemade cleaning wipes to work for you in your organized home with our easy instructions:

Materials and Equipment Needed:

cylindrical plastic food storage container, 10-cup capacity
extra-large roll of paper towels
cleaning agents of your choice (recipes follow)
electric drill with 1/2-inch drill bit
electric knife
liquid measuring cups

Instructions:

In the garage or workshop area, place a small block of wood beneath the plastic food storage container lid. Use electric drill to drill a 1/2-inch diameter hole in the center of the container lid.

For best results, select an extra-large roll of good quality paper towels for this project. Less-expensive towels fray or shred when pulled through the holder; thicker quilted towels have greater cleaning strength and withstand more scrubbing. Even at $1.39 per roll, cost for homemade wipes will be less than 75 cents, not including the storage container.

Without removing the paper towel wrapper, use the electric knife to cut the paper towel roll into two shorter rolls. Save the second roll for a refill later. Be patient! It may take up to two minutes to cut through the towel roll and cardboard tube inside.
Remove the wrapper, and place one short paper towel roll inside plastic food storage container. Using a liquid measuring cup, gently pour one of the following cleaning solution recipes over the top of the paper towel roll.

You will need between 2 and 4 cups of cleaning solution, depending on the size and absorbency of the paper towel product selected. These recipes make about three cups of solution; increase or decrease amounts if needed.

General Surface Cleaning:

1 1/2 cups white vinegar
1 1/2 cups water

Disinfectant Cleaning:

1/4 to 1/2 cup pine cleaning solution such as Pine-Sol brand
2 1/2 to 2 3/4 cup water

Window and Glass Cleaning:

1/2 cup rubbing (isopropyl) alcohol
2 1/2 cups water
1 tablespoon white vinegar

Place the lid on the plastic food storage container, and allow paper towels to absorb cleaning solution for 4 hours to overnight.

Open the food storage container. Gently pull the wet cardboard tube from the center of the paper towel roll and discard. Carefully pull the end of the paper towels from the inside, where the cardboard roll had been. Thread the end of the towels through the hole in the lid, and replace the lid.

Pull gently on the exposed end to separate the cleaning wipe.

Tips:

As you use the wipes, they will begin to dry out, so add more water and/or cleaning solution as necessary. Allow wipes to stand overnight before continuing to use them after adding more solution.

You may vary the strength of the cleaning solutions as necessary for your household, using more cleaning agents for a stronger wipe, less solution and more water for a milder product.

Tuesday, April 7, 2009

Easter egg tips and tricks

Ditch the packaged egg decorating kits! You probably already have everything you need for great Easter eggs in your house.

Basic colouring
Did you know that you can use regular food colour to dye your eggs? I have been using it since I was a child and gives a very vibrant or light pastel colour, which ever you like, it just depends on how many drops of colouring you put in your water.
Here's how; Combine 1tsp of vinegar with a half cup of hot water and a few drops of food colouring. Many boxes of food colouring comes with a colour chart or you can follow this one that I found with a quick google search. Keep in mind that all brands on the colouring will vary slightly and that using less will give a more subtle colour while using more will create a deeper colour. Food colouring can also dye your plastic containers and wooden items like your table.  Coffee mugs work great for this project because they are deep enough to submerge the whole egg and are made out of a ceramic which is not likely to stain. As with all craft projects with kids you might not want to do this while your kids are dressed in their Sunday best as it may stain clothes. The chances of staining will depend on the brand of food colouring you choose though I find it's pretty safe. For best results, let the water cool before you start dipping the eggs.

To dry the eggs
I hope you have been saving toilet paper rolls or paper towel rolls. Take a few of these and cut them into half inch disks. These disks are perfect for placing the wet dyed eggs on instead of back into the egg cartons to keep the colour from smearing and to display them right away. 

A little more fun?
Sneak into the kids crayon collection and collect the white crayons. If you find your kids don't actually use white crayons you can keep them with the rest of your adult crafting stuff too. If you don't have any white crayons yellow ones will also work but I think the white ones are way cooler.
Let the decorator draw or scribble all over the egg with the crayon before dipping in the dye then when it's dipped the dye does not stick to the wax and leaves cool patterns on the eggs. 

Hope you and your family have a traditional Easter, either with new traditions or old!

Monday, April 6, 2009

Make your own Swiffer accesories

I can not take credit for this. This collaboration of links has been put together by Tipnut and am just sharing them with you here.

15 homemade Swiffer cloth patterns includes patterns for knitting, crocheting, sewing and even a no-sew option for the craft challenged (it uses an old sock... brilliant!) 

It also includes a link to a pattern to make your own Swiffer duster and how to take the cap off of a Swiffer wet-jet canister so you can fill it with whatever cleaner you prefer.

The link to the full article in tipnut is HERE.

I personally saw a reusable Swiffer style cloth at Dollarama an just picked one up the other day and then use a spray bottle to get the floor a little damp with a home made cleaner. I'm not as fancy as some people with the whole "Swiffer system" but it works for me.

Wednesday, April 1, 2009

$5 challenge

Living with Lindsay is having a $5 craft challenge. The button has been there on the right for a little while now. Have you noticed it? Either way, I decided to use the cute box tutorial that I posted in February as my entry, but add to it a little bit to freshen it up.

The directions are the same, but I prettied up 2 boxes that I use several times a day.
 These boxes under my baby's crib hold her clothes and her diapers. Kind of like a make shift drawer they were meant to be a temporary measure until we bought a new dresser for her. They are in such a convenient place and just the right size though they have been there about 6 months now. 

This is them all wrapped up like presents.

 Lowering the safety bar for the crib keeps the troublemaker out of the "drawers".


Check out other crafts that have been entered into this contest at Livingwithlindsay


Tuesday, March 31, 2009

MYO Laundry detergent


There are so many tutorials for making your own laundry detergent online and I actually use a recipe that I found and did not make my own. I found mine on Wikihow (can you tell I use wikihow a lot?). The tutorial is for a liquid detergent which I have made with a friend and I regularly use the powder version in the video on the same page. So for this reason I will not post another tutorial because that would be redundant. Instead, please check out the tutorials for the wet and dry versions already available at Wikihow. I can vouch for both those recipes since I have used them myself.

The page of tutorials is HERE

Some benefits of home made laundry detergent:
Save $$$. I bought all the washing soda and the Borax at Wal*Mart for about $3 each. Doing about 10 loads of laundry a week one pair of boxes lasts several months. The two I have were bought about 6 months ago and I am about half way through the box. This is with giving some away too.

Save time. It only takes about 10 minutes t0 make, believe it or not. As you make it more and more often you get better and faster. You will get used to having all the tools ready and make less of a mess too. This is faster than going to the store to get some!

Save more money on more cleaning products. The combination of borax and washing soda can be used to clean many things. I use about 1/4 cup of both with 4 gallons of water and use it where I would an all purpose cleanser. I even wash windows with it. The borax has recipes on the side of it for other cleaning uses. This mixture is great for washing the toilet too.

Works in HE washing machines. I have not personally used it in high efficiency washing machines but have been researching this kind of soap online and have seen multiple reports that it works in HE machines. HE washing detergent is more expensive than the regular stuff so this is really something people with HE machines should be doing. 

Clothes doesn't get stinky. Ever notice how sometimes when you forget the laundry in the machine overnight it gets a little stinky and you have to re-wash it? Well this laundry detergent stays fresh even after sitting in the machine for long periods of time. No re-washing!

Easy to alter to your personal needs. Sensitive to soaps? Are your kids sensitive to cleaners and can only use mild baby soap? Use a very mild soap or a baby soap in place of the regular bar of soap called for in the recipe. You can even add a few drops of an essential oil if you like a lavender sent or any other sent in your laundry detergent or any other cleaner you might make with these ingredients.

I really hope everyone does this. It will cut down on your cleaning bills!

Monday, March 30, 2009

Fun with plastic bags

Unless you are super smart and remember to bring cloth bags with you to the store you probably have too many plastic bags under your sink or in the pantry just waiting to get thrown out or recycled. Well what if there were uses for these things? Turns out there are many hings you can do with old plastic bags. 

One great thing to do with them, for anyone that sews, is to fuse them together to become one thick plastic sheet that can be sewn like fabric to make anything from purses to rain coats to shoes to new shopping bags to whatever. It becomes hard to tear but you can still cut and sew it.
A really simple bag fusing tutorial with video can be found on etsy.com's how to section and another tutorial with a slight difference at cut out and keep. There is also a tutorial on the threadbanger website on how fuse the plastic and also make a padded laptop case with the newly fused plastic. 
Threadbanger mentions that you should not use pins when sewing the fabric but that you should use bobby pins instead to prevent having too many holes in your 'fabric'


Another great thing is good news for people that like to crochet and knit is to make plastic bag 'yarn'. This is also really simple and again you can make bags or anything you would normally knit or crochet, even dresses. 


Just for a larf, before typing this up I used the search option on wiki how and looked up more tutorials for things to do with plastic bags and found a few of interest.

Friday, March 27, 2009

How to make a vase from a plastic bottle

I found this tutorial on wikihow.com 
There is really a lot of information on there. Go to the Wikihow to make a vase from a plastic bottle page to learn more about making this vase but I have posted the basic tutorial here.
 Here is the finished product. Much more elegant than you would have thought for a recycled bottle, eh!
Anyhow, now for the tutorial.

You will need a plastic bottle, like the 500 ml  kind that had pop in it, scissors and some decorative stones.


Steps

  1. Mark and cut the smooth middle portion of the bottle to give an even edge approx 7.5 to 8cm (3") above where you want the fluted rim to be.
  2. Measure and make straight, evenly spaced cuts all the way around the bottle. Cut the segments in half and then cut each of those in half to make even, thin strips.
  3. Carefully press and fold all the strips outward to make a level edge all the way around.
  4. Press the bottle upside down on a flat surface to ensure an even edge.
  5. Weave the tip of a strip over the next one and under the next two. Fold and crease it so that the tip is at the place shown here by the arrow.
  6. Fold and crease the next one the same way, but weave this one over two and under one.
  7. Fold the third strip and weave the same as the first one.
  8. Continue around in this pattern until the last three and tuck each one under the next until woven in completely.

[edit]Tips

  •  Be sure to maintain the regularity of the creases.
  • Because the plastic will be very lightweight, add marbles, beach glass, or decorative stones in the vase to provide a weighted base.
  • When you add the marbles and stones and allow the light to shine through your vase, it will produce beautiful, stained glass-like colors.